🔥 탄탄한 NestJS 필요부분 요약(소켓, 몽구스편) 🔥
<1> 몽고DB 관련 내용
데이터베이스란? 데이터의 집합, 저장소
RDBMS (관계형 데이터 베이스)
NOSQL (비관계형 데이터 베이스)
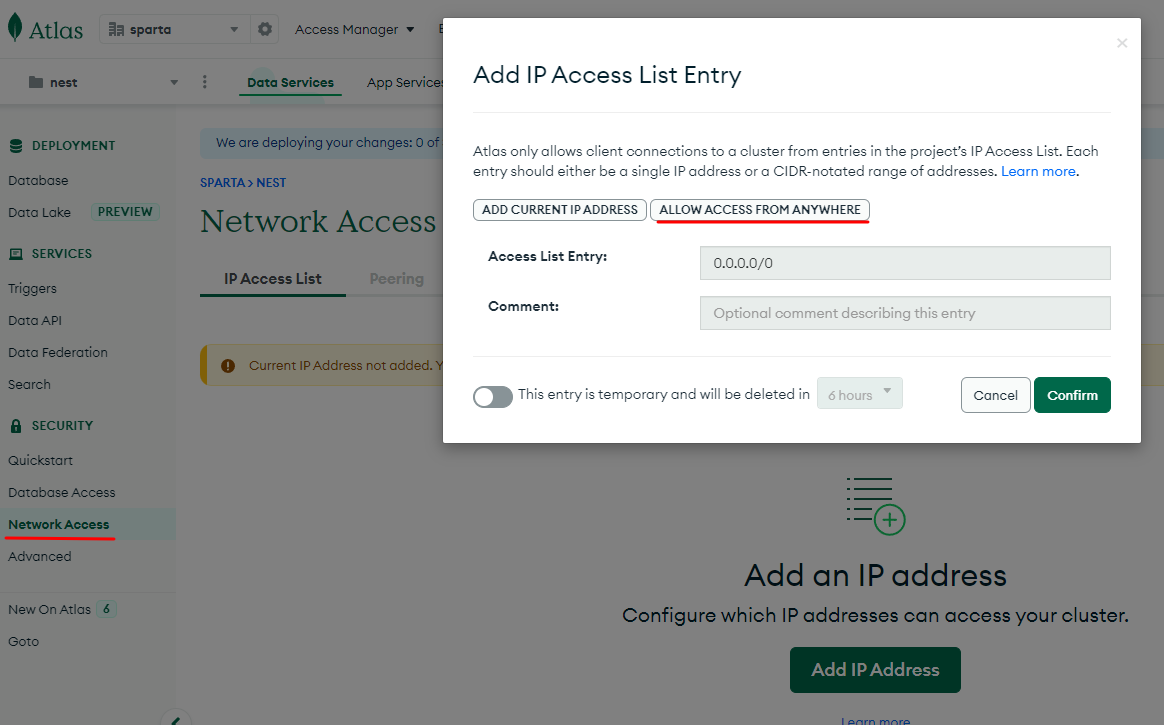
위에 사이트에서 가입후 프로젝트 생성 -> Clusters 생성
(개발환경은 ALLOW ACCES가 맞는데, 배포시엔 바꿔야하는지 모름)


순서대로 모두 진행하고 파일을 다운받는다. 아래는 설치한 프로그램 실행화면

해당 URL은 비밀번호와 맨뒤에 데이터베이스 이름이 들어있다.
연결후에 데이터베이스를 만들때 오류가 발생했다.
오류발생
user is not allowed to do action [createCollection] on [nest.chatMessage]
해당 문제에 대해 검색해보니 atals에서 사용자 권한설정을 안해줘서 나타나는 오류라는 것
atals 웹사이트에 들어가서 로그인 후 클러스터의 Database Access 를 클릭해 사용자 Edit를 누르면

출처 : https://yamea-guide.tistory.com/entry/atlas-MongoError-user-is-not-allowed-to-do-action-find-on
위와 같이 설정후 만들면 에러해결 완료
<몽구스 연결하기>
https://bit.ly/3moGwZG 강의자료 깃허브
Mongodb는 데이터베이스 자체 이고 Mongoose는 Mongodb 의 객체 모델링 도구 입니다.
Node.js의 관점에서 mongodb 는 mongodb 인스턴스와 상호 작용하기위한 기본 드라이버 이며
mongoose 는 MongoDB 의 객체 모델링 도구 입니다.
-> 접근 방식의 차이
npm i @nestjs/mongoose mongooseapp.module.ts
import { Module } from '@nestjs/common';
import { ConfigModule } from '@nestjs/config';
import { MongooseModule } from '@nestjs/mongoose';
import { TypeOrmModule } from '@nestjs/typeorm';
import { ChatBackEndModule } from './chatBackEnd/chatBackEnd.module';
import { ChatFrontEndModule } from './chatFrontEnd/chatFrontEnd.module';
import { TypeOrmConfigService } from './common/config/typeorm.config.service';

@Module({
  imports: [
    ConfigModule.forRoot({ isGlobal: true }),
    TypeOrmModule.forRootAsync({
      useClass: TypeOrmConfigService,
    }),
    //몽구스 연결
    MongooseModule.forRoot(process.env.MONGO_URL, {
      useNewUrlParser: true,
      useUnifiedTopology: true,
      //useCreateIndex: true,		에러발생 코드 주석처리
      //useFindAndModify: false,
    }),
    ChatBackEndModule,
    ChatFrontEndModule,
  ],
})
export class AppModule {}
위와 같이 설정후 서버를 켰는데 에러가 발생한다.
서버를 키면 데이터베이스와 연결하지 못하고 10번까지 연결을 시도한다.
모두 시도한후 상세 에러 메시지를 알려주니 연결실패시 꼭 기다리자
[에러일기] 9회차 - 몽구스 데이터베이스 연결실패
1. 문제 [mongoosemodule] unable to connect to the database 강의와 문서들을 보며 몽구스를 연결시도했다. 그런데 서버실행만 하면 계속 위와 같은 문구가 발생하여 나를 괴롭혔다......ㅠㅠ 수차례 여러가지
pyoja.tistory.com
<몽구스 명령어 정리>
몽구스 공식홈페이지 (https://mongoosejs.com/docs/api/mongoose.html)
인파 명령어 정리 (https://bit.ly/3Ymz12X)
자주 사용되는 명령어 정리
// 1. 새문서 만들기
const newDoc = new MyModel({ field1: 'value1', field2: 'value2' });
await newDoc.save();

// 2. 문서찾기
const docs = await MyModel.find({ field1: 'value1' }).exec();

// 3. 문서 업데이트
await MyModel.updateOne({ field1: 'value1' }, { field2: 'newvalue2' }).exec();

// 4. 문서 삭제
await MyModel.deleteOne({ field1: 'value1' }).exec();
사용예시)
// Create a new document
const newDoc = new MyModel({ field1: 'value1', field2: 'value2' });
await newDoc.save();

// Find the document
const doc = await MyModel.findOne({ field1: 'value1' }).exec();

// Update the document
doc.field2 = 'newvalue2';
await doc.save();

// Delete the document
await MyModel.deleteOne({ field1: 'value1' }).exec();
<2> Nest.js
비주얼스튜디오 단축키
왼쪽창 숨기기/보이기 = 컨트롤 + b
터미널 닫기/열기 = 컨트롤 + j

<3> 랜덤 채팅 웹앱(소켓 프로그래밍)
서버사이드 렌더링 : 서버에서 html 렌더링해서 브라우저로 보여준다 (nestjs)
클라이언트 사이드 렌더링 : 클라이언트 사이드에서 html 렌더링한다. (클라이언트 사이드 = 브라우저)
소켓 : 입구, 콘센트
소켓 연결 방식 : 양방향
(*중요*) emit과 on 으로 서버와 클라이언트가 소통합니다.
예를들어
서버 = emit('sendMessage') 로 메시지를 전송하면, [이벤트네임 : sendMessage]
클라이언트 = on('sendMessage')으로 메시지를 받을 수 있습니다.
이안에 또 emit을 넣고 서버에서 on으로 받는 로직을 만들어 on 과 emit의 관계를 만들어야 합니다.
const socket = io('/user');  //클라이언트

@WebSocketGateway({ namespace: 'user'}); //서버

// 위와 같이 url을 연결할 수 있다.
쓸모있는지 모르지만 몰랐던 사실이라 적음
// chats.gateway.ts
socket.broadcast.emit('user_connected', username);
return username;

// index.js
sokect.on('user_connected', (username) => {
   console.log(`${username} connected`);
 });

 // broadcast로 자신을 제외한 모든 소켓에 데이터를 전달할 수 있다.
emit과 on에 있는 'user_connected'는 이벤트 네임이라 부르며 서로 연결된 관계이다.


2개이상의 DB를 사용한다면 위와 같이 레포지토리에 2개 이상 주입시키면 됩니다.
models 폴더 생성
//* chattings.model.ts

import { IsNotEmpty, IsString } from 'class-validator';
import { Prop, Schema, SchemaFactory } from '@nestjs/mongoose';
import { Document, SchemaOptions, Types } from 'mongoose';
import { Socket as SocketModel } from './sockets.model';

const options: SchemaOptions = {
  collection: 'chattings', //db이름을 설정
  timestamps: true,
};

@Schema(options)
export class Chatting extends Document {
  @Prop({
    type: {
      _id: { type: Types.ObjectId, required: true, ref: 'sockets' },
      id: { type: String },
      username: { type: String, required: true },
    },
  })
  @IsNotEmpty()
  user: SocketModel;

  @Prop({
    required: true,
  })
  @IsNotEmpty()
  @IsString()
  chat: string;
}

export const ChattingSchema = SchemaFactory.createForClass(Chatting);
@Schema(options)
@nestjs/mongoose는 새로운 몽구스 스키마를 선언하는 라이브러리의 데코레이터입니다.
options스키마에 대한 추가 구성 옵션을 지정하는 데 사용할 수 있는 선택적 매개변수입니다.
@Prop
@Prop는 스키마에서 속성을 선언하는 라이브러리의 데코레이터입니다
//* sockets.model.ts

import { IsNotEmpty, IsString } from 'class-validator';
import { Prop, Schema, SchemaFactory } from '@nestjs/mongoose';
import { Document, SchemaOptions } from 'mongoose';

const options: SchemaOptions = {
  id: false,
  collection: 'sockets',
  timestamps: true,
};

@Schema(options)
export class Socket extends Document {
  @Prop({
    unique: true,
    required: true,
  })
  @IsNotEmpty()
  @IsString()
  id: string;

  @Prop({
    required: true,
  })
  @IsNotEmpty()
  @IsString()
  username: string;
}

export const SocketSchema = SchemaFactory.createForClass(Socket);
//* chatBackEnd.module.ts
import { SocketSchema, Socket as SocketModel } from './models/sockets.model';
import { Chatting, ChattingSchema } from './models/chattings.model';
import { MongooseModule } from '@nestjs/mongoose';
import { Module } from '@nestjs/common';
import { ChatBackEndGateway } from './chatBackEnd.gateway';
import { ChatRoomService } from './chatRoom.service';
@Module({
imports: [
MongooseModule.forFeature([
{ name: Chatting.name, schema: ChattingSchema },
{ name: SocketModel.name, schema: SocketSchema },
]),
],
providers: [ChatBackEndGateway, ChatRoomService],
})
export class ChatBackEndModule {}소켓모델과 채팅모델을 chatBackEnd.module.ts에 등록합니다.
name과 schema에 대해 설명하겠습니다.
name : 몽구스 모델의 이름을 지정합니다.
채팅 메시지에 대한 Mongoose 모델의 이름인 "Chatting" 문자열을 반환하는 클래스 의 정적 속성입니다.
schema : 몽구스 모델의 스키마를 지정합니다. 메시지 텍스트, 보낸 사람, 받는 사람 및 타임스탬프를 포함하여
모델 의 속성과 필드를 정의하는 Mongoose 스키마입니다